Showing posts with label home decor. Show all posts

Thursday, January 10, 2013

Packed away and out in a couple of months!

I've totally been a slacker these past couple of months.  Not just on the blog but in my home.  I usually am on top of things when it comes to the Holiday decor and I have always had the tradition of putting away all the Christmas stuff on New Years day....nope not this year.  See, I have been in a funk!  My crafty bug has not been very creative, well I shouldn't say "not" creative...I have just been to busy.  I actually went almost 2 weeks without stepping a foot into the craft room.  EEK!! LOL!!  I'm making a change though.  No resolutions here - just changes.  This past weekend I started up on some new projects and Monday night/morning I packed up alllllll the Christmas that was in my home.  Tuesday after work I took all of it upstairs to put away. Yay for me!

Here is my Christmas tree, I had already started removing stuff from the bottom.


I sure do have a lot of stuff that goes into the tree.


Well Christmas is officially put away....."see you in a couple of months".  Last Christmas post I promise.

I hope everyone has had a great week so far.


Pin It

Sunday, July 8, 2012

Embroidery Art - Day of the Dead Pillow

 Where has the year gone?  Can you believe by the end of this week we're already half way through July.  I'm already counting down till we get to October.....I can start decorating for the Holiday's. Woo-Hoo!!!

This project that I'm going to share with you was for one of our great friends Birthday.  Her lovely parents were the lucky ones to receive the Patriotic Pillow.  I want to thank all of the lovely blogger's who featured it.  I tried to grab all of the feature buttons, if I'm missed one I'm sorry - please let me know if you don't see yours.

The theme of this pillow is a little early in the year to celebrate....that is if you do! It is usually celebrated November 1st.  I don't celebrate the day, but I do love the art work of everything.  Some of the art work is simply stunning. If you like that sort of thing. I went on-line to get some inspiration for this project.  If you look up Day of the Dead art, you'll see skulls with flowers, hearts, webs, crosses and swirls, in many different colors.  Well my friend LOOOOOVES this kind of stuff and I knew she would be extremely happy when she saw what I made for her.

Here is some information on Day of the Dead History

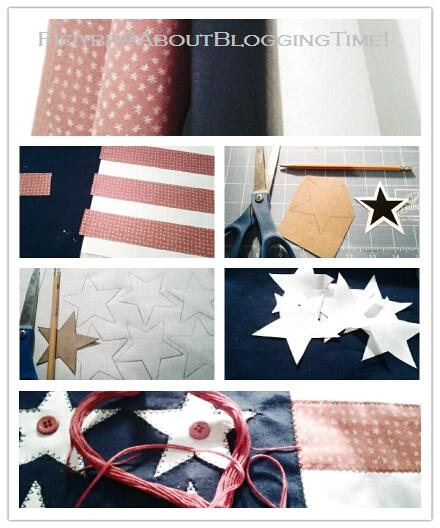
(Picture quality is not the best, but I'll try to explain as best as I can.)
1.) I folded a sheet of paper and drew a couple of half skull shapes.
2.) Then I cut them out and decided on the one I liked the best.
3.) I traced (2) skulls on a sheet of blank paper and made copies of that.
4.) Then with the inspiration from the net, I drew out the skulls.  You know it's not very easy to draw teeth.  I had such a hard time, I kept drawing and erasing. 
1.) I ended up drawing (8) different skulls, I chose the 4 I liked the best.
2.) I pinned the skulls onto foam board with tissue paper over it to trace.
3.) I then traced the skulls with black permanent marker.
4.)  I cut out the tissue traced skulls and set them aside.
5.)  Now I was ready to start.  I pinned it onto the fabric, then put it onto the hoop. 
       Embroidering on the tissue paper was easy, I was able to tear away and pick out the pieces.  I didn't really have a plan, I just picked different colors.  As I finished each skull I took it off the hoop to pin the next skull where I wanted it to be.  I really loved the way it all came out.
Drawing out the skulls, embroidery and sewing took me about 27 hours combined....it probably would have been less if I wasn't watching re-runs of Ugly Betty or The Office, lol.
For the back I chose a black with white polka dots.  I have to say my favorite skull has to be the last  one with the blue flower.

  I'm happy to say that she was really excited to receive this gift.  I'm glad!!

Thanks for stopping by to view this weeks project.

Everyone have a fabulous week.

Linking up Here and


Pin It

Monday, June 25, 2012

Patriotic Pillow

This past Saturday we drove out to the country to visit some wonderful friends.  They have their property in Sommerville, TX and a short gulf cart drive to the lakes edge.  I love it!!  Well, we never go or leave there empty handed. Not that we expect or they expect anything, it's just a nice gesture since we only get to see them about once a year.  I wanted to make something that I knew they would enjoy and appreciate.  So I decided on a Patriotic Pillow.  Of course it can be put out all year round, not just the 4th of July. 


The Patriotic Pillow
(I apologize for the not so great pics. I was in a hurry)
I decided on the more muted colors of Red, White and Blue. 
1.) Washed and pressed the 3 fat quarters.
2.) Made my cuts, I didn't measure - I usually eyeball everything.
3.) I printed out a star, traced it onto cardboard and cut it out.
4.) I traced stars on the light fabric.
5.) Cut out my stars and they're ready to be sewn on.
6.) I sewed using a zig-zag stitch.  I sewed on the stripes to the light fabric, I sewed the stars to the blue fabric, then sewed the blue fabric onto the light fabric.   Then I used embroidery floss to sew the buttons onto the stars.

For the back I used burlap lined with the light fabric, I didn't want the stuffing to poke out thru the burlap.

Here is the finished pillow.  I have to say they really loved it.  I loved making it for them. 
I made another pillow for my friend's birthday but I will show hers later.  If you follow me on Instagram (@fifiybr) then you got to see a sneak peek of it and I also introduced her pet potbelly pig Bacon.  Her parents are the ones who received the Patriotic Pillow.


Thanks for stopping by, everyone have a fabulous day!! 

Until the next project.....


Linking at these spots and others on my Link Party page


Photobucket
Pin It

Monday, June 18, 2012

Spray Paint project!


I spray paint!!!  Why, because this stuff can pretty much change anything into something pretty to look at.  Frames, furniture, glass, even shoes!!!!  I'm still trying to convince theHubs why I have so many spray paint cans or why I keep buying more....lol!!

I spent one of these past Saturdays spray painting outdoor plant pots.  They were due for a upgrade.  When we first moved into our new home we had no plants what so ever, the front door looked sad and lonely.  My mother-in-law gave me this potted plant, it is a type of Ivy.  The pot was painted white, probably with house paint not sure and after 7 years the paint has chipped away.  I sanded down as much as I could as you can see from the picture below.


It's no secret, I love easy projects.  This was super easy too!  I didn't remove the plant, because I was lazy and I said I loved easy projects.  So I just covered the plant with a plastic bag, tucked in all the long Ivy arms and pushed wooden skewers in around the bag so I wouldn't get spray paint all up in there. 

Ta-da!!  Fresh and white! 


I picked up this salmon colored pot at a garage sale for $1.00, yay!!  I washed and dried this baby and it was ready to be painted.  I loved the shiny color it had, it just didn't go with the outdoor color of the house.  So I just chose another shiny color to make a statement in the entry way.   


LOVE IT! Who doesn't love a nice turquoise?


Now, they are ready to show off!


I just put them here to take the picture.  They have since been moved, the blue one is on the walkway now.  

Everyone have a fabulous day, stay cool if it's hot out or stay dry if you're getting the rain! 

Pin It

Monday, May 21, 2012

In full bloom - Framed Flower Art

Who doesn't like LOVE flowers???  Well you're the weird one if you don't!  My favorite flower to receive is Tulips...in any color, but my all time favorite are Yellow Tulips!  Getting flowers, any kind for that matter for no reason is always a pleasant surprise.  My second all time favorite flower is the white Peony.  Really, these are soooooo beautiful.  I love them when they are fully bloomed or just barely opening.  

Okay, enough of my flower rambling!  I decided to make a piece of art to resemble a fully bloomed peony.  Can you guess what I used to make the flower?  I was also able to use a piece of fabric from my scrap busting bin and I also reused a garage sale find frame.

Sorry for all of the pictures....I couldn't decide which ones to show, so I just kept most of them.

Have you guessed yet?  It's really simple.


To make the flower petals was fun and easy...but the burning of my finger tips, not so much .
The flower looks like porcelain here doesn't it.


I really enjoyed making the center of the flower....after it was cooled I then spray painted it. 
You figured out what was used yet.  C'mon they're repinned all over Pinterest.


I wiped down the frame....my bestie found it for me at a garage sale for - dun...dun...dunnnnn 25¢
I cut out a piece of cardboard to fit the frame, then wrapped it in the piece fabric.  For the backing I just glued a piece of newspaper so you couldn't see all the glue and tape.  Sorry I forgot to take a picture of it.
Then I hot glued the flower onto the fabric.  After the glue dried I stood the frame up and put glue into the crevices.  I don't want it to fall off after it's put up.


It looks really great if I say so myself.  Well of course I'm gonna think that, lol!!


The three different textures used were wood, fabric and plastic!! 


Fine....
I used spoons for the petals and forks for the center! See, now you're thinking...really or whaaat!
Cool huh!!

Now it's ready for hanging.  I just have to decide how I should hang it.  The hook is at the top, the way the pic above is.  But I could easily add hooks to hang in the other way. 

Leave comments letting me know which way to hang it.
↨ upright
↔ sideways
   I'll tally up the comments next week and hang it up.

Thanks for stopping by!  Have a fabulous week!

Linking up here and many other parties!  Take a look at my Parties page.


Today's Creative Blog


Pin It

Sunday, April 22, 2012

Crochet Covered Jars - Mother's day gifts or whenever gifts!

Well I took a break from all the scrap busting this week! I wanted to do something else so I decided to cover some jars with some really bad crocheting.....as you can see from the pics below I'm not the worlds best crochet-er.  I did get the affect I was looking for though. This is what I will be making for Mothers day gifts for my mom, sisters, M-I-L and S-I-L's.  


I have about 100 empty jars and bottles in a spare closet waiting for future crafting plans.  When I get to them is another question and theHubs is getting a bit worried with all the jar hoarding going on. "Men", sometimes they don't understand.


I know the big thing that's going on around blog land is painting and tinting glass jars, but I don't want to do that just yet.  I don't want to do it because everyone else is doing it. Sometimes I want to be the oddball when it comes to crafting. ('',)  Yes, I know I'm not the first the crochet cover jars, but I'm showing you the jars that "I" covered. 


I used some yarn that I had bought at the $ store...and used some jars from my stash and cut some knock-out roses from my backyard.  Doesn't it feel great to be able to use what you have and not go out and buy anything.  The jars can be used as plant holders, candle holders or what ever you decide to do with them.


I hope everyone has a great week!  Look out for me I'll be linking up to lots of parties this week.  Check out my I ♥ to Party links page to see where I link up and where you can link up as well.

One of the places where I'll be linking up at is Craftbotics


Rosie is having a month long link up, so what'cha waiting for go over there and link up your AWESOME projects.  She also has co-hosting opportunities if you email her.  Go and check out her cute and crafty blog.


Pin It

Monday, April 9, 2012

Scrap Busting - Yes....more! It's a desk pad.

The Scrap busting fool is back!!  Since all I'm using is scraps I didn't have enough to really make something more glamorous, like fancy place mats for the dining or breakfast tables. But I did have enough scraps to make a desk pad for my laptop.....yay!!


Here's what I did...


1) I cut up 2 x 2 inch squares
2) I arranged them the way I wanted it to look, stacked them by rows,then sewed them to make the strips.
3) Sewed the strips together and now you can see it what it will look like.


4) Here you can see what the back will look like.  I used a white on white paisley print.
5) Now to baste, bottom and top sandwiching some batting.  Then I pinned to keep it all in place.
6) Since this is a hodgepodge of different scraps I just top-stitched squares on the inside of every square on the top. (boring)


7) Whew....I was close to not having enough scraps for the the binding.  I had to sew lots of little pieces together, then cut to make it about 2 inches in width.  Make 2 folds towards the center, press with the iron....then fold that in half and press with the iron....done!
8)  I pinned the binding allllllllllll the way around.
9) Sewed the binding on and mitered the corners....at least I didn't mess those up because that sucks!


10) Done......It's not perfect but it will work for me.
11) Now my Laptop can sit all fancy on its new desk pad.  Perfect fit too!!
11)  Just had to show off my little desk top too!  You can barely see my plant on the left side. I've had that ivy for about 13 years now.  It stays on the desk in my craft room...why?? Oh because I have 2 really bad and sneaky fur babies that like to shred my plants.

Hmm....I wonder if I'll have more Scrap busting posts!  Maybe, I do have lots of it.  You might get too bored with it.  We'll see, lol!
Thank you for stopping by!! Have a great day!!


Pin It

Monday, April 2, 2012

Scrap Busting - Scrappy Table Runner

Well sadly I was not one of the winners of the $$MegaMillions$$ 
<insert sad mopey face here> lol!  
But I'm happy that I'm super blessed to have what I do have and I am not without. I have the things I need and most things that I want.

Okay, there has been a lot of scrap busting going on in the craft room.  I have bins of scraps that I just don't want to get rid of.   So, I decided to get busy with the scrap busting.  
Without going into too much detail - the hearts were made from scraps of a quilt (not so mellow yellow) I am still working on from last summer <sigh>, the top is a piece of muslin fabric, the bottom is a piece of white on white paisley print and batting for the middle.  

I never tire of seeing what people are making or creating.  So I hope you all never get tired of seeing the things that I post.  If you really read and visit most blogs you'll see the same things, just different spins on it.  Bags, totes, clothes, pillows, curtains, mug rugs, painted furniture, recipes - you name and there are about 3 zillion different variations of the thing. Which is why I never get tired of seeing so much inspiration.

Here is my spin on one of the many things that I have made.

Tumbling Hearts
Scrappy Table Runner


Thanks for stopping by!  
Let me know what you think.... I comments!
(I try to e-mail to all my comments, I want you to know that I do read them and
appreciate them.  If you still have no-reply set up, I reply to the comment on the post.)


Pin It

Friday, February 3, 2012

All you need is L-O-V-E.....

Well, probably a little more than that...

I guess I'm on a pillow kick....because as you can see I made more!  
How can you not love your own L-O-V-E pillows!! 

Plus who doesn't love ruffles and pink?


I had a fun time making these!!


As you can see, my "E" is a little wonky! It's okay I still love it!!


Why is the "E" a little wonky you ask....well, because of not so great planning.  I usually eyeball stuff that I make...so when I was sewing my seams, I guess I went in too far on the inside of the "E" seam, which is making its ends kind of close in. 


I L-O-V-E u for taking the time to visit my page!


L-O


V-E


My  L-O-V-E pillows are about 12 inches tall.


My "O" pouf, don't you just adore it!
  I was in the middle of making this when my needle broke earlier this week.


After V-Day  I can still use the "O" pouf as a regular decor pillow if I want to. 


Doesn't it look like a yummy cupcake?


Valentine's Day is 11 days away annnnddd 17 more days till my birthday.....eeek!!  Not sure if I've said how old I am before, but without looking at past posts, can you guess how old I'm going to be?