Showing posts with label crafts. Show all posts

Tuesday, October 22, 2013

Halloween Crafts 2013 - with the nieces and nephews!

WOO-HOO...... next week is Halloween!! 
 
This is just a short post sharing some pictures from Halloween craft day 2013.  We had so much fun.....the kids are always entertaining.  I'm happy that next year we will have baby Vincent to share this experience with his cousins.
 
It was such a nice day out, I decided to do the crafts out on the patio.
 
Let the Halloween crafting begin...
 
 
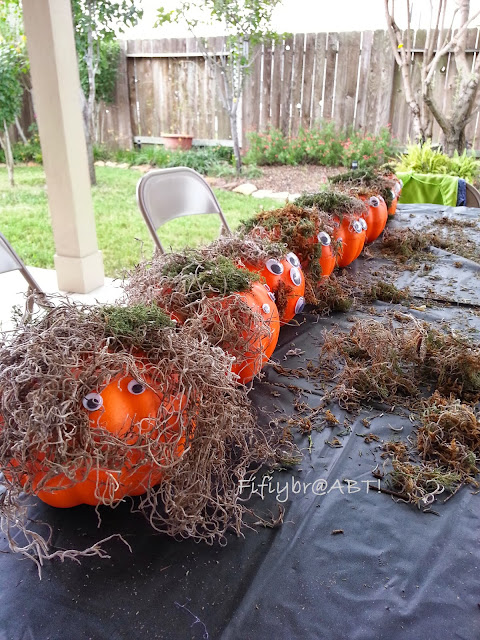
This years pumpkin theme was "Swamp Thing"!  I'm glad I decided to do this craft outside...can you imagine the mess in the house.  It was so much fun seeing the kids get crafty with all the eyes and giving their creations hair cuts.  Silly kids! Baby Vincent got his very own swamp thing pumpkin too!! 

 
We also made mummy lanterns. Even made one for baby.  His is the 1st one with the googly eyes.

 
We or should I say my sisters were in charge of making the yummy Mummies, I'm in charge of adding the eyes!!  Well someone wasn't keeping time....we'll just blame my brother for that one.  They were still delish because there were none leftover.
 
 
Here are the kiddos inside, hands washed, shirts off....why, I have no idea, lol!  But they were all excited and ready to make their own pizzas.


Awesome afternoon with the people I love!


Pin It

Thursday, October 17, 2013

Words and Pictures Wednesday....on a Thursday, lol!

** Well this was yesterdays post....I don't know why it didn't post. Oh well here it is!
 
 
Seems like this month is flying by just as quickly as last month did.  Here we are the 16th of October and I'm already wishing it was Thanksgiving already.....I blame the baby and Guy Fieri of the show Diners Drive-ins and Dives. I don't remember which day but the hubby and I were watching a rerun and they had the most delicious, the most mouth watering open faced turkey sandwich you have ever seen.  With all the fixings....okay I'm making my mouth water again, LOL!
 
Any who things are getting done.  This past weekend was Halloween Craft day with my nieces and nephews.  If you don't know I have done Halloween/Christmas craft day with them every year since they were little toddlers.  I remember when it was just the two nephews, now those same two are 9 and 8 years old.  Plus, next year I get to do crafts with our little boy!  I definitely can't wait for that day.
 
Planning is happening for the baby shower, almost 2 weeks away, eeek!! The invitations have been sent out.  RSVPs have been trickling in.  I think I've changed the registry up for the last time.  It was so over whelming. 
 
TheHubs and I will be getting the dresser this weekend. So we can finish up the nursery.  It's all coming together now.  I can't believe it, there will be a baby in there in a few short months.  Next month we will also have a maternity photo shoot done, I'm really excited about that, so is theHubs.
 
Well here are a few pics that I have to show you on the Pics and Words Wednesday......
 
This would be Ms.Betty FurPants, she believes she is human.  She is spoiled and thinks everything we eat she has to taste test. This is one crazy cat!
 
Fall has begun, which usually means so does baking....Sadly being pregnant, tired and even more tired - Anything that needs to be in the oven has to be easy.  So, sadly no baked goods from scratch right now. This momma is exhausted!!

 
Here is baby Vincent and myself... 26 weeks which means 6 ½ months.  My ankles look swollen but they're not.  I sprained my ankle pretty bad a couple years ago....it's never looked the same, lol!!


Pregnancy Questionnaire
How far along: 26 weeks
 
Total Weight Gain/Loss: 3.6 lbs.....

Maternity clothes: Definitely

Stretch marks: Nope

Sleep: I'm up to 5 pillows now...but I can sleep through the night without getting up to pee!!

Best moment last week: Just feeling him move around.

Movement: lots of punching and kicking! 

Food cravings: Spicy, Spicy, Spicy.....I can't get enough!
 
Food aversions:  lettuce & sweet or sugary stuff (boohoo) < still all the same!
 
Gender: BOY

Labor signs: I've started having Braxton Hicks contractions....I hope they stay light until it's really time. 

Belly button - in or out? still in
 
What I miss: Seeing my toes....they are officially gone from my view.
 
What I am looking forward to: My baby shower.

Milestones: Almost reaching the third trimester.  Time has flown by.


Thanks for stopping by!!  Have a fabulous week!


Sunday, July 14, 2013

Mini me aprons!


Why is it that everything that comes in a tinier version of something is so cute?

Here I'm sharing some child aprons that I made for my nieces.  I do holiday crafts with them and we don't want to get their clothes all dirty.  These aprons are just simple plain cotton aprons, no sewn on flowers or ribbons or anything fancy. They will be and have been stained with paints, glues, glitters, inks, flour, frosting.....everything.  I didn't want to make them where I would be worried or upset that they had gotten them dirty.  I made these aprons last year, I just hadn't had the time to make any post about it.  Since I don't have anything else ready with pictures and such, I thought I would post it now.  Sorry for the awful pics., these were the only ones I had for this project.  Plus I like to sew in the dark with just my lamp on, lol!!


 Mini me Aprons

I had an apron from the dollar store, which was used by my nephews but they have since outgrown them.  So I just used that one as pattern.

I selected the fabrics I wanted to use from my fabric stash and got to work.  

1. I folded the fabric in half and the pattern in half.
2. I then aligned the folded edges together and pinned the pattern to the fabric.
3. With chalk/marking pen I made dashes all the way around the pattern, I used a 1/2 inch allowance.
4.  Then cut out the piece that I would use.


Now to make the bias tape.  I really wish I had one of those handy bias makers.....I think I need to give some hints to hubby. 

1.  I used the left over fabric and cut about 3 x 170 inches of strips.  
2. I just cut the strips ironed and sewed them all together to get the 170 inches.
3. Then fold the edges into the center, ironed and then folded that in half then ironed again.


Now to sandwich and pin the bias tape onto the edges. So basically 4 pieces of bias tape will be sewn onto the apron. Top, bottom and the two arm sides.
1.  Pin along the bottom, you can see I got a little pin happy!  Cut at the edge.
2. Pin along the top neck area and cut at the edge. 
3. Now sew these two part onto the apron.  I used the regular foot and sewed as close to the edge.
4. Now using the left over bias tape, you want to make two even pieces.  So fold it in half and cut.  These will be used as the neck tie and waist tie.
5.  Arrange these two along the arm area of the apron. 
6.  Starting at the very end sew along the edge and continue around the arm area to the other end.


Here is the finished product. 


These are very simple to make, and one could make them more festive or fancier.  Add pockets or ribbons.  You could do anything.

Everyone have a fabulous week.

Pin It

Wednesday, October 24, 2012

Halloween Crafts 2012

Here are some pics from my Halloween Craft day with my nieces and nephews.
We all had a great time.  I think their favorite part was rolling out cookie dough.

Painting Haunted Houses and Making Mummy Pumpkins
Rolling out cookies and making Mummies to eat! 
 Mummy Pumpkins, Cookies, and best cousins!  Oh and a photo bomb from my Peanut, Jake!! lol!


Pin It

Sunday, September 30, 2012

A Halloween project!

Yay, for Fall! This is my favorite time of the year.  It's rainy today, but it makes it cooler outside.  
I didn't have time to finish any of my current projects that I have.  So I'm committing to ultimate crime - I am re-posting, lol! Ahhhh...I'm so sorry but I didn't have time.  I am constantly studying and I have another test on Tuesday.

So, here is a pic and a link for my Halloween Yarn Wreath.  If you don't know what yarn wreaths are you must live under a rock deep in the forest by the lonely trees. 

Halloween Yarn Wreath
Thanks for stopping by.  Have a great week.


Photobucket
”momnivores
Pin It

Sunday, September 23, 2012

DIY Bracelet - Using Shrinky Plastic

Hi everyone!!  I lay here in my bed writing this post all late because I took forever trying to get pics ready and doing laundry and watching some good ole football with theHubs, Go TEXANS 3-0!!! I'm super sleepy and tired but I will finish this post, lol!! Yes, I am the biggest procrastinator.... for one I've been on vacation with my honey this past week so this post should have been done and ready to go.  
I hope everyone had a fabulous weekend, it was the 1st day of Fall.  Here in Houston you couldn't tell we were still in the 90's, just a tad bit warm.  We were still able to enjoy the day though.

Okay, now that I have confessed here is what's going on in Casa Fifi and theHubs...
I am still working on some more of the thread-sketching but I wasn't finished with it, I can't decide what exactly I want to make it into yet.  It will probably end up being another pillow, who knows.  I really like this technique a lot.  It's so different and the more imperfect you sew the better it looks (totally my opinion).  
Well here is another project I finished.  It's something simple and sweet and very easy to do.  If you have an imagination you can pretty much create anything you want.  What am I talking about - Shrinky Dink Plastic!!  I totally love this stuff.  It is the coolest to use - with adult supervision if children are crafting with this.

I hope you like what I made!


 Thanks for stopping by!  Have a great week.  
Linking up at my favorite parties on my party page and also here:
Craft-O-Maniac


**If you're a new reader or follower please let me know so I can return the follow.  
The GFC and Linky Follow tabs are at the very bottom of the page.


Pin It

Sunday, September 2, 2012

Elephant Softie - using a pattern

Okay, I wasn't going to post a project this week.  Buuuuuut I had to show off this cute little elephant that I sewed up.  It was included in the birthday tote that was for my for my niece.  

 There are tons of tutorials out on the net and there are too many cute ones to choose from as well.  Since I was short on time and needed to get this done quickly I decided on this one here.  Jess from Craftiness is not Optional has one of the cutest and easiest patterns available.  Go check out her page, she has some really awesome stuff and her blog is great.

Now on to the cuteness.....


Look who has the cutest tail ever.....


Big blue floppy ears to go with the cute tail!


There you have it.


This pattern only has two legs, but I will definitely have to try making one with 4 legs.

See, I told you it was going to be cute!
Thanks for stopping by, you have a fabulous week.

Linking up at the parties on my party page and here:
Its So Very Cheri


Pin It

Sunday, August 26, 2012

Summer vacation is over....

Why do the weekends go by so quickly? Because time sure does fly when you're having fun that's why, lol.   This was the last free weekend for everyone here in Houston.  School starts Monday....so does the crazy traffic, the getting caught behind school buses, and the waking up super early to avoid all of this.  I myself will start my evening classes on Tuesday...yay!!  So, for everyone that starts school tomorrow good luck and have a fantastic semester.

Now for this weeks project.  My next project will probably be in two weeks, just till I get situated with my class schedule.

I'm showing off a new tote that I made for my niece Aubrey.  It was for her second birthday.  I really enjoy sewing and making thing for my loved ones and for myself.  


Red on the inside.


For this tote bag I sewed a double pocket on the outside for some extra storage.


If you make it, then tag it.  My tag "Fifi Made This"


Okay are you ready to be attacked with cuteness.....really how can you not love this.  I made this as the special little add-on for the tote.


After about 7 different variations, I really liked the way I drew this little elephant.  I then traced on felt and sewed on the extra little pieces.  Then I drew the letter "A"  for her name and made it too.  Cute huh!  Her birthday theme was "Circus".


This has to be my favorite tote that I have made so far.


Until next time!  Thanks for stopping by.  

Participating at all the fabulous parties on my party page and here:


Pin It

Sunday, August 5, 2012

I felt like I was sewing foreeeeeeeever!

Not really, it actually didn't take that long, it was the prep that took a while.
I must say you will be bombarded with a ton of pics.....sorry for that.  I'm a visual person, I like to see pictures and I feel that you will understand it better if you can see what I'm seeing.  I'm a weirdo like that, when people talk I have to see their mouth moving, if not all I hear is mumbles. LOL!!

Okay, now on to the project.  I have been wanting a mat for the entrance to my craft room.  Why you may ask....oh just because.  Well I went on a adventure looking for the right materials to make it.  I definitely didn't want to spend lots of money and I knew I wanted something handmade. By me, duh!! I went to Goodwill, sadly I couldn't find anything that I was totally in love with.  Now I realize I could have gone to Wally World to buy a cheapie for 5 bucks, but what would be the fun in that.  Then I went to $ tree and bought 200 feet of poly rope.  That cost me about 4 bucks. 

When I went to another Goodwill, I found this twin sheet for 3 bucks, it would have to do.  All the way home I thought about how I could snazz it up a bit.
I decided I would make some of the colors pop.  Boy, was I in over my head.   With 3 fine tip markers I went about my merry little way and outlined the green, pink and dark pink prints.  For this twin size sheet it took me 6 hours to finish!
Can you see the change?  It went from Dull to Cheery!
After the (6) hours, my fingers were cramping, my neck was aching from looking down and I had a headache from the permanent marker smell....but I was happy to be done with that.  Now I was ready to cut and tear.  What??  ←  that's what theHubs said....after all that you're going to cut it up.  Yup!  I took the pinking sheers and snipped about every 1 inch along the edge.  Then I just ripped it into what you see below.
Sorry, I didn't take a picture of the part where I tied the end of the rope and the end of the strip together.  Then I wrapped the rope a couple of times to cover it.  To start off the mat I folded the start of the wrapped rope down about 2 inches  (like this ║) then I sewed it together.  Then I just continued wrapping, turning, and sewing.
I used a zig-zag stitch for the whole mat.  I kept the center of the rope and the center of the foot aligned so I could get the zig-zag on both sides.  (╥)
Okay, I'm a lefty and I do most things backwards!! Lol!!  Well, this was totally my fault for not thinking this through.  I'm so impatient sometimes and I pay for it with mess ups like this.  When I was done with my first 50 feet of wrapped rope....I had a curving bowl mat......NOOOOOOOOOO!  Yeah, instead of running it through and turning left I was turning right.  So hence the almost bowl.  I had to start again and I did it correctly.  I took the seam ripper to the bowl and used this piece at the end.  So, it worked out.
See, I'm doing it the right way here!! 
Please ignore the Hobbit feet below!!  Geez, they look like stand in feet for the Lord Of the Rings movies, lol!!  There are shadows around, I don't have cankles okay! My feet are little and cute...so theHubs says, lol!! I love to stand on it barefoot because it's always cool. 
I really love the way it turned out!  Even though it did take the (6) hours to add the color I'm glad I did....it pops right?
I'm really tempted to make a bigger one...who knows maybe I will!  So in total it cost be less than $8.00 and my time. 
I'm glad you stopped by to check out the latest project.  Everyone have a great week.


Linking up at the fabulous parties in my party tab and also at these great places -
Craft-O-Maniac
Watch Out, Martha!
Fine Craft Guild

Pin It