Showing posts with label frames. Show all posts

Monday, May 21, 2012

In full bloom - Framed Flower Art

Who doesn't like LOVE flowers???  Well you're the weird one if you don't!  My favorite flower to receive is Tulips...in any color, but my all time favorite are Yellow Tulips!  Getting flowers, any kind for that matter for no reason is always a pleasant surprise.  My second all time favorite flower is the white Peony.  Really, these are soooooo beautiful.  I love them when they are fully bloomed or just barely opening.  

Okay, enough of my flower rambling!  I decided to make a piece of art to resemble a fully bloomed peony.  Can you guess what I used to make the flower?  I was also able to use a piece of fabric from my scrap busting bin and I also reused a garage sale find frame.

Sorry for all of the pictures....I couldn't decide which ones to show, so I just kept most of them.

Have you guessed yet?  It's really simple.


To make the flower petals was fun and easy...but the burning of my finger tips, not so much .
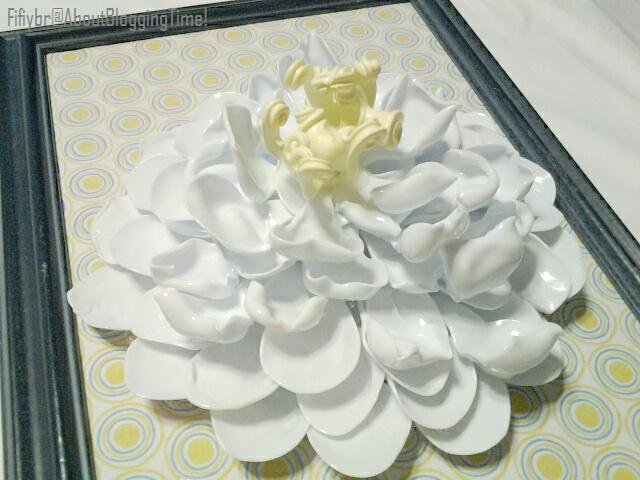
The flower looks like porcelain here doesn't it.


I really enjoyed making the center of the flower....after it was cooled I then spray painted it. 
You figured out what was used yet.  C'mon they're repinned all over Pinterest.


I wiped down the frame....my bestie found it for me at a garage sale for - dun...dun...dunnnnn 25¢
I cut out a piece of cardboard to fit the frame, then wrapped it in the piece fabric.  For the backing I just glued a piece of newspaper so you couldn't see all the glue and tape.  Sorry I forgot to take a picture of it.
Then I hot glued the flower onto the fabric.  After the glue dried I stood the frame up and put glue into the crevices.  I don't want it to fall off after it's put up.


It looks really great if I say so myself.  Well of course I'm gonna think that, lol!!


The three different textures used were wood, fabric and plastic!! 


Fine....
I used spoons for the petals and forks for the center! See, now you're thinking...really or whaaat!
Cool huh!!

Now it's ready for hanging.  I just have to decide how I should hang it.  The hook is at the top, the way the pic above is.  But I could easily add hooks to hang in the other way. 

Leave comments letting me know which way to hang it.
↨ upright
↔ sideways
   I'll tally up the comments next week and hang it up.

Thanks for stopping by!  Have a fabulous week!

Linking up here and many other parties!  Take a look at my Parties page.


Today's Creative Blog


Pin It

Monday, August 22, 2011

Easy Framed Monogram!

I have tons of frames that are just sitting there waiting to be used!!  So I decided to make this framed monogram.


Here's what I used:
frame
transparency page
two pages of scrapbook paper
newspaper
scissors/pencil/marker
glue gun/glue sticks
art paint/paint brush
scrap fabric
cardboard
mod-podge


Here is my $0.25 frame from a garage sale.  I just wiped it down and removed any stickiness from the price sticker.


Here are some of the scraps that I used. I cut them diagonally to make strips. I also used solid pink and solid white strips....(these were squares for a mat that I was going to make for my sewing machine, but decided on something else.)


I decided on rolled fabric rosettes. I just glue the fabric.


I added a couple to the corner.....I can never decide on how many to add, lol!

I traced the letter "Y" with a marker.  Then I painted it and let it dry.

After it was dried, I carefully cut it out and set it aside.


Scrap page 1.   This is the one I ended up using.

Scrap page 2.

I put the frame on the scrap page. I used the pencil to lightly trace the inside of the frame.


I cut out the the traced square, then I traced around onto the cardboard for the backing.


I mod-podged the page to the cardboard.


I then mod-podged the letter on and put it aside to dry.  While the letter and backing dried I set the frame on a piece of newspaper and cut around.  After the backing dried, I pushed it into the frame until it was all the way in.  I used the glue gun to glue it to the inside of the frame.

I glued the newspaper to the back of the frame with my glue stick. (yesss I know the paper is upside down....hey who's gonna look behind it after it's hung up?) lol!


Here is the finished product and it is now hung in the part of my craft room that is done.
(My craft room is being reorganized/rearranged/cleaned.  It's been a mess for weeks with
sewing fuzz,fabric scraps, dried glue, yarn, markers, and paint, lol!)


Hope you enjoyed this easy project!!   If you make one let me know, I'd like to see it!!


Tuesday, August 9, 2011

Easy Crafting!! ☺

Have you ever come across something sooooo AMAZING OR SPECTACULAR that you can't ever imagine how life could possible go on with out this item??  (Well in the craft world that is)!! ☺

Mod-Podge .......

I feel like it's necessary to slap this stuff on everything!!  Creatively that is!!  Chairs, dressers, frames, desks, mirrors, vases, the list goes on and on!!   I have soooo many ideas, my brain hurts from all the thinking! So I just did a couple of small items!!  Maybe you'd like to do the same!


What I used:  craft frame, stamp and ink, marker, mod-podge, sponge brush


I used my butterfly stamp .


Here I colored in some of the butterfly stamps.  You can do all of them if you wish.


Here use the sponge brush and apply a layer of Mod-Podge.


Here I set it aside to dry and Mod-Podged other stuff!


At the bottom you can see the finished butterfly frame.  While that dried I had a boring set of frames so I Mod-Podged pieces from my fabric scrap stash onto the backings of the frame inserts.  They came out pretty nice.  Once those dried I added my pics.  And I did the "A" from my fabric stash too!! 


Well there you go....easy Mod-Podging!!  Show me what you're making!!