Showing posts with label pillow. Show all posts

Sunday, September 16, 2012

Thread Sketching - Owl Pillow project

Okay, if you haven't noticed yet, my go to projects are always going to be a pillow or a bag.  This weeks project is a pillow as you can see.  I thought I'd try my hand at thread sketching...basically drawing with the sewing machine.  

Some people use a darning foot, but I don't have one so a regular presser foot is just fine.  I freehand drew the owl.  If drawing is not your best skill don't worry you can trace any pic you want.  The lines being sewn don't have to be perfect anyway. 


See...not very perfect.  I used different stitches that were available on my machine for the eyes.  The rest was just sewing lines, back stitching, and turning my piece around.


More non-perfectness.  I used interfacing and batting when I sewed the owl.  Gives it that squishy, wrinkly, quilt like look.  


My favorite part was the eyes.


For the rest of the pillow I just did freehand quilting lines.


I finished it off by adding a blue just like the eye's for the back.  I really enjoy the technique of thread sketching.  It's really fun to do.

Thanks for stopping by to view the new project.  Everyone have a fabulous week.

Linking up to the awesome links that are on my party page and to these wonderful places:


Pin It

Sunday, July 8, 2012

Embroidery Art - Day of the Dead Pillow

 Where has the year gone?  Can you believe by the end of this week we're already half way through July.  I'm already counting down till we get to October.....I can start decorating for the Holiday's. Woo-Hoo!!!

This project that I'm going to share with you was for one of our great friends Birthday.  Her lovely parents were the lucky ones to receive the Patriotic Pillow.  I want to thank all of the lovely blogger's who featured it.  I tried to grab all of the feature buttons, if I'm missed one I'm sorry - please let me know if you don't see yours.

The theme of this pillow is a little early in the year to celebrate....that is if you do! It is usually celebrated November 1st.  I don't celebrate the day, but I do love the art work of everything.  Some of the art work is simply stunning. If you like that sort of thing. I went on-line to get some inspiration for this project.  If you look up Day of the Dead art, you'll see skulls with flowers, hearts, webs, crosses and swirls, in many different colors.  Well my friend LOOOOOVES this kind of stuff and I knew she would be extremely happy when she saw what I made for her.

Here is some information on Day of the Dead History

(Picture quality is not the best, but I'll try to explain as best as I can.)
1.) I folded a sheet of paper and drew a couple of half skull shapes.
2.) Then I cut them out and decided on the one I liked the best.
3.) I traced (2) skulls on a sheet of blank paper and made copies of that.
4.) Then with the inspiration from the net, I drew out the skulls.  You know it's not very easy to draw teeth.  I had such a hard time, I kept drawing and erasing. 
1.) I ended up drawing (8) different skulls, I chose the 4 I liked the best.
2.) I pinned the skulls onto foam board with tissue paper over it to trace.
3.) I then traced the skulls with black permanent marker.
4.)  I cut out the tissue traced skulls and set them aside.
5.)  Now I was ready to start.  I pinned it onto the fabric, then put it onto the hoop. 
       Embroidering on the tissue paper was easy, I was able to tear away and pick out the pieces.  I didn't really have a plan, I just picked different colors.  As I finished each skull I took it off the hoop to pin the next skull where I wanted it to be.  I really loved the way it all came out.
Drawing out the skulls, embroidery and sewing took me about 27 hours combined....it probably would have been less if I wasn't watching re-runs of Ugly Betty or The Office, lol.
For the back I chose a black with white polka dots.  I have to say my favorite skull has to be the last  one with the blue flower.

  I'm happy to say that she was really excited to receive this gift.  I'm glad!!

Thanks for stopping by to view this weeks project.

Everyone have a fabulous week.

Linking up Here and


Pin It

Friday, January 20, 2012

Pillowcase Dress - Tutorial!!

Here is a tutorial for the Pillowcase dress....technically I used bandanas!  So, I guess you can say Bandana Dress....whatever! lol! It's super easy to make....once you make one you can't stop!  These are not the greatest pics.....there was just too much natural light coming in through the window.


I washed all the bandanas and pressed them.

2 bandanas and a yard of ribbon.  
This is why I use bandanas, finished edges.
My sister say's it's cheating, but I told her I didn't have a
serger so it's not cheating, it's working with what you got.

Put bandanas right sides facing together, you want to align them, you can pin at the bottom and the middle if you want.  This will help when you do the folds to iron and sew. (Aligning will let you know how much you need to fold, sometimes the bandana is a little wonky or off a bit.)  

Find the tag, this will be the top part of the dress and also a indicator to tell you if this is the inside or
outside of the bandana.  On both bandanas  make a 1/4 inch fold (towards you), press and sew along existing thread line of just above, also back stitch. The tag will hide inside the second fold.  Or you can just cut off.

On both bandanas make the second fold (towards you) about 1 inch and sew close to the edge. Make sure you do a back stitch on both ends. The inside will look like it has (2) seams once you've sewn the folds (*see pic below) , while the out side will have (1).

If have labels, tag it!  You made it didn't you?
After you sew up the folds, align bandanas again right sides facing each other, this will help to have a symmetrical dress and make it easier to sew up even sides. *hint folds and tags are on the outside of this bandana sandwich (",)

I measured down about 4 inches and pinned, you can decide how big you want the arm hole area.
Start sewing a 1/4 inch seam from the hem line up to where the arm hole pin is.  When  you are close to the pin pull it out and sew a small curve out then back stitch, like the picture above.  
I didn't add a picture of this but, it's up to you how you want the outside side seam to look.  After sewing up the sides, I ironed open the seam, then closed, folded and pressed to one side and sewed up from the hem line again. It just makes it look nicer and makes it a little more durable. Again you don't have to do this.  (*I had already given the dress away so no pic) 

Use 1 whole yard of ribbon.  Pin one end and push through one side , then the other.  
Once  ribbon is through , align tails and tie a bow. Adjust as needed.  I even out the tails by cutting just a small piece off, then a quick burn with a lighter so the ribbon won't unravel. 

See, easy peasy!!  Let me know when make one, I'd like to see it.  If you have any questions leave a comment or shoot me a email.


Pin It

Friday, January 13, 2012

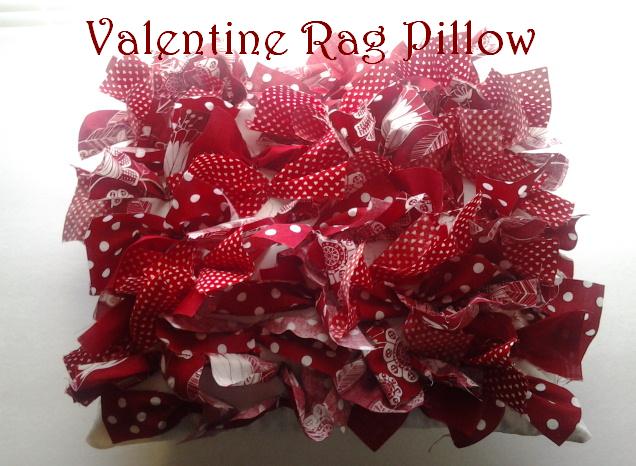
Love, love, love - Valentine Rag Pillow covering

What!!! Another pillow!!  Yes, I make tons of pillows.....1) super easy to make, 2) "hello" they are too cute and 3) you can never have to many pillows.  But this one is special.......it's for Valentine's Day!!  ♥ <smooch, smooch>


Using all my red scraps!!
Sewed my bow-tie garland!! I really wanted to leave it on the wall! :^(
I cut all the bows off of the thread and positioned them on the white paisley fabric I used, I then pinned them, then sewed them on!!  Lots of work!! 
Here it is before sewing the back on.


I just love Valentine's day, not only cause it's a day of love, but because I get to eat chocolate without the guilt!! (",)

And it's just around the corner.....this year is already flying!

Linking up Today's Creative Blog here

Pin It

Friday, January 6, 2012

1 week down, 51 to go! 2012 is going to be great!

**updated pic of finished pillow added


Wow...what a year, I mean week!  lol!  I hope that everyone had a super awesome New Years Day!!  We hosted about 20 people, adults and children this year. We were all very excited to pop fireworks since we had a fire ban in place since before July 4th. So we all kind of went crazy buying tons of fireworks.  It was pretty awesome, most of the neighbors were out as well so it was quite a show that night.  Looking forward to many great things this year.

This 1st week of the year has been wonderful.  I have started on a lot of new sewing projects.  Lots and lots of cutting has been going on in the craft room. I'm going to be trying a lot of new techniques and skills.  I don't ever really follow patterns or measurement....which can be good and bad! It's always in my head....I'll cut something then measure and write it down. I usually can never find the piece of paper I wrote it down on...so I guess that's the bad part. I try it out first to see if I like it, if I do I'll do it over to make it look neater and more aligned. 

Right now I'm trying my hand at Cathedral Window's.  I've seen this done for quilts, pillows or bags.  they are all very lovely but I feel like the fabric used makes it seem "old".  I want to make it look modern. I hope I didn't offend anyone. 

I have a stack of scrap circles that was to be used for making Yo-yo's, but I stole some and have been putting them together.  I put together some reds, blues and denim circles. Again this is my first time doing this, so it's not the greatest.  When I'm done sewing the curves down I'll sew it into a throw pillow.

I LOVE red!

I guess if I were to measure correctly, this would probably look much more aligned.

It looks a little better with the curves that are sewn down.

I'm still not too sure if I liked sewing these....it just takes too long.  I like quick results. lol!  But, I'll just have to work at it I guess.  Leave comments and let me know what you think.  I'll post updated pics when I'm finally done.


**updated pic added


Linking up at Today's Creative Blog here

Monday, September 12, 2011

I finally finished my decorative petal pillow......

and guess what!!  I didn't realize that I was out of stuffing..... ugh I was super annoyed last night!!  I was prepared to get it stuffed and ready for decorative duty! Nope!  It's on my list of things that I need to get.


So I will go ahead and just show you the "flat version", it's still very pretty! <---in my opinion, lol!!


I know everyone has made a petal pillow in blog land! I've seen them at the stores as well!!  Who ever created them first, well we just may never know!!  The majority of them that I have seen have been made with felt of all colors.  Mine was made from Olive Green Velveteen upholstery cloth!  It was free-cycle item that I picked up one day, I had not idea what I was gonna do with it, but i knew I wanted it.  I saw one at Target and immediately said....hey I can make that!!  So I started on it like in April and then forgot about it....not really I just got really busy with other things so it went into my things to finish pile! I started working on it Saturday night and finished Sunday night.  This is when I realized I had no more stuffing!!  ugh....don't you wish HobbyLobby was open 24hrs like Walmart is?


So, now that it is like 95% complete, here is the picture story of how it was made!

My Petal Pillow!
I drew and cut out a small template and just traced onto the back or the fabric with a marker,  and since I'm a big dummy I used a red marker too! lol!! Then I cut out like a million petals....I sure did get a cramp in my hand.

Lots of arranging was going on......
More rearranging....  I didn't want to make it exactly like the one's I had seen.    I don't follow rules or patterns,  I like to eyeball everything.  I like to make and disassemble it until its what I like.  That's what makes it unique!  lol! 
I was finally happy with this arrangement.  If you really look , the center is not really centered!!  
I put a little fold on ever petal.
I sewed across, then did a back stitch.
See, I did this to all million petals! ☺
Here is the stitch that I used....thank goodness for my fancy-schmancy  sewing machine!
With correct sides facing each other I sewed across the edges, with a 1/4 seam allowance.
I also did a back stitch at each corner (+).
I made sure I left a 5-6 inch opening, so I can get that flower to come out.
 I also back stitched at the edges of the opening I didn't want it to unravel.
Clipped the corners, making sure I didn't cut the stitching.
Now that it's turned right side out, I can start to glue down the petals.  This  fabric is kind of floppy , not stiff and sturdy like the felt would have been.  The glue helped me adjust the petal  so that it wouldn't be just laying flat on one another.  Plus gluing down the petal helped with the not showing of the red marker....oopsies!! (only some petals showed the red still....lol)
Starting at the very bottom layer I glued the tip down, allowing the petal to kind of  balloon in the center.  Then just moved on to the next level till they were all glued.
For the center I cut out a 5 pointed petal, I just eyeballed it here.  It didn't need to be perfect .  Then I just folded it in  it's center till I got the shape I wanted.
After getting the shape that I wanted, I sewed (3) stitches to the back part.
I then just used my hot glue gun and glued down the center flower, then I glued down my little gem for the center.
I ♥ the way my flower came out.
I love how the flower is not centered and looks like it's bursting  from  the right corner.
It's a pretty big decorative pillow.  About 17 x 21 inches.


When I finally get my stuffing, I will be sure to re-edit this post with a new pic!!  Well I hope you've enjoyed my pics. anyway