Showing posts with label tote bag. Show all posts

Sunday, February 17, 2013

Another gift......Tote/Baby bag

Welcome everyone....thanks for stopping by.  I want to also say hi to all my new readers glad you are here.  

Okay, here is a new tote/baby bag that I was working on.  I also made bibs and burpies but you've already seen what I can do so I won't show you them, LOL!  This gift set was for my niece.  One tote, two bibs and two burpies.  

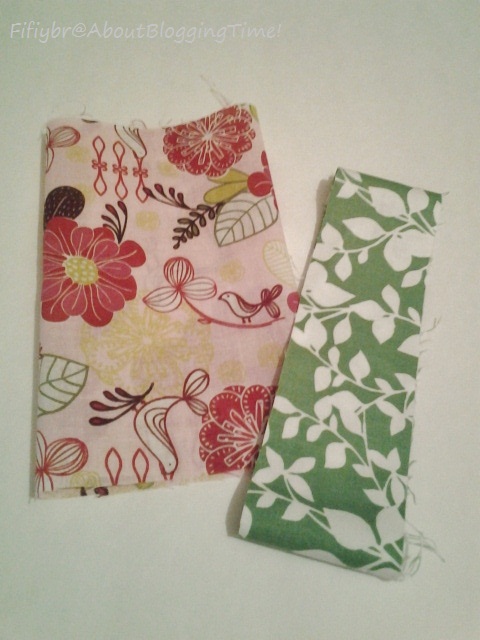
Here are the fabrics that I used for the tote.
The pink and orange were used for the inside of the bag and the pockets.


Here is the finished product.  I just love this bag.  It's big enough for all the baby items that she will need to carry around.  A big pocket on the inside, two big pockets on the outside and a magnetic snap to close it up.


Sorry I didn't get enough pics or any of the inside.  I was in a hurry and was already walking out the door.  As you can see it was all ready to be given away.  We had to drive all the way to the other side of town.  Since Houston was hosting the NBA All-Star Game, it was a nightmare getting anywhere with all of the traffic, plus we're already dealing with construction everywhere...so you can just imagine.

We finally made it to the baby shower.  The tote and the bibs & burpies were a big hit.

Well, everyone have a fabulous week.

Linking up to the awesome parties on my party page and also to these amazing parties:


Pin It

Monday, October 15, 2012

I've been sewing and studying!!

I'm back....did you miss me?  Oh, you didn't realize I was gone huh....I kind of figured...lol!!!  I've been busy with school stuff.  
Well I'm glad you're here now to see what I have to show you. 

I've been working on different ways to sew my bags.  Like one handle instead of two or using batting instead of interfacing, buttons and zippers, pockets or no pockets.  This bag has no pockets, I used batting and is big and squishy and I totally love it!!  

I call it - The Squishy Catch-All tote.
(Sorry for the bad pics, we've had some rain and I could never get any good lighting from the window.)


You can just throw anything in there.

Linking up to the wonderful parties on my Party page and here:


Whimsically Homemade

Thanks for stopping by....till next time!!

Pin It

Monday, May 28, 2012

New Summer Tote Bag!

It feels like Summer is already here in Texas.   We've had some days in the 90s, thank goodness there has been a breeze on the days we've had to be outdoors.  I probably would have melted, lol!  One of those breezy days was on Saturday.  It was for my niece's daughters 1st birthday.....so I guess that would make her my great niece....wow that made me feel old.   I can't be a great anything at 32..... (*_*).

I love making things for people....especially my family and especially for sweet baby girls that turn one!!  Once they're one I feel like they need a new bag instead of a big ole bulky diaper bag.  Plus this bag is big and deep enough to carry diapers and wipes and whatever mom needs to carry.

This bag was one of my favorites to make.  I love the green and pink colors.  


I'm not going into too much detail about how it was made.....check out my tote bag tutorial if you'd like.


Pockets sewn on, straps ready to be put on.


I always add a extra little some to the bag.  So I made this cute little stuffed "K" for her name.


See...cute huh!


Love, Love, Love it!!  


Here's the inside!


Now, since it was for her birthday the gift of the tote bag doubled as a gift bag.....everyone loved it!  Here it is filled with her gifts - clothes, a stuffed animal and a lady bug.   Ladybug is her nickname and that was the theme of the party.  I am a rebel when it comes to themes or registries....I hate them and I will give what I want.  So if they don't like it...oh well take it back...that's just me! (",)  But since I was in a good mood, I added the little lady bug, plus it was cute.


Here it is ready to be given away to the birthday girl!


Thanks for stopping by and checking out my weekly project!

Have a great week everyone.


Pin It

Monday, March 5, 2012

The Hobo - new sewing project

Hey guys and gals.....
Okay, maybe only one guy - the hubs! lol!  I'd like to thank you all for stopping by each time I have something new to share with you, also thank you for all of the lovely comments!  My goal is to share what I've made with you all and that you all will like it.  Yes, I did make this and everything else that I've posted about and said I made.  
I say this because I received a couple of emails regarding my blue tote bag - saying that it was impossible to make it look that perfect and not be professionally made (um what does that even mean, lol) or this looked like a bag that so-in-so store sells.  I didn't even tell the hubs, I just read them and deleted them.  Honestly why do people have to be rude or say negative things. First of all many stores sell many different kinds of tote bags or purses, I've never said I was the inventor of the very 1st tote bags.  I stated that I made "this" blue one.  Hello, if you have the basic skills in sewing anyone can sew a simple tote bag.  The hubs can tell you, I'm always in my craft room making something...if its not sewing, its sketching or crafting . 

Well....Enough of the negative-nancy!
I'm happy to show you the new Hobo bag I made. 
This bag is reversible....but I only put a pocket on the "inside". It does look cute either way.
I sewed in a mini pocket as well. Can be used for a cell phone, lip gloss, a compact or whatever you want to put in it.
Here is a close up of the fabric....I absolutely love it!  You can also see one side of my tag.  
It says FIFI MADE THIS.
Here is the other side of the tag.  I say if you made it tag it!
I absolutely loved this fabric.

This bag was a gift for my sister-in-laws birthday! I'm happy to say she loved it!
Thank you for taking the time to stop by and visit!! Leave comments to let me know what you think.  (",)


Sharing at:


Pin It

Monday, February 27, 2012

Sewing stuff - New tote bag!

Just wanted to share the new tote bag I made a couple of weeks ago.  I've made a couple more since making this bag, I just forgot to take the pics.  I will be making more totes this week.... these little sausage fingers are gonna be super busy. I'm going to be making big hobo bags...is that really what they're called? lol!! 


For some extra flare I'll just tie the selvages or leftover fabric to the handle.  Sometimes it's a flower or a initial. I like to personalize it a little bit.


Both the outside and inside pockets have brown on the inside with the blue stitching.


I really like the way this bag came out!  My sister loved it!  


Linking up at:
Pin It

Monday, December 19, 2011

Finished project - New Tote Bag!

Hey everyone....


Can you believe that this weekend is Christmas already!!  I can't....it's coming too fast!  Where's the pause button?


Well here is a semi-tutorial for a simple tote bag.  Everyone one can make bags, well at least I hope you can. So I won't bore you with too many details, I'll just make you go insane with all the pictures!! hahaha!!  If you haven't noticed already, I like to post lots of pics. I'm not that much of a writer so I post pics, duh!


Here is a tote that I've been working on for a while, only because I have had so much stuff to finish.  This is a birthday present for my besties daughter. Which I call my fake niece....I'm her aunt but not by blood! Her birthday was on Nov. 29, so yeah I'm pretty behind on it! I guess it's gonna be a Christmas gift now. lol!  She turned 13 years old, oh my....where have the years gone?  Now I do feel old. 

Many people sew totes differently, I usually sew mine 2 different ways. I always get compliments. Which is a good thing!

Here are the 2 ways I sew totes:

1) I sew 1 outside shell with gussets, 1 inside shell with gussets. then fit the shells together and sew the top, pockets and handles. It can be reversible.
2) I sew 1 outside and 1 inside together to make a wall, then sew both walls together, make the gussets and expose the guts (seams) as like to call them. If the inside is a solid color the exposed seams give it a pop of color when you open the bag. I'll have to post a pic so you can see what I'm talking about.  


Totes can come in all shapes and sizes, shore and wide, tall and skinny.  So it's up to you to decide those dimensions. 

On to the bag!!
  •  I cut out 4 pieces for the bag (2 for in/2 for out) and 4 pieces for the pockets (2 for in/2 for out).  I cut out 2 strips for the handles. I cut out 2 pieces of interfacing for the bag, 2 for the pockets and 2 strips for the handles.


I ♥'d this fabric!! Her mom helped me pick it out.
I made my pockets. 2 pocket pieces and interfacing.
I found my center and sewed my pocket onto one of the outside  pieces.
Sew up the outside pieces, right sides facing each other.

  • After sewing a 1/4 inch seam, I open and press the seams. I do the sides and the bottoms.  Then I open the corners to make my marks for the gussets.


ironed

Measure 2 inches down from the tip.
Can you see my chalk line?
I have no idea why this pic is upside down!!
Well I just cut the triangle off. I usually leave about a  1/4 inch.
Here is the outside shell turned right side out.
  • The following pictures just show me doing the exact same thing as above just adding the interfacing to the inside shell.

Measure, find my center and sew.
Put the two pieces together, right sides facing each other.
Then sandwich with the 2 large interfacing pieces, then sew.
I pressed seams, added the gussets and cut.
This shell doesn't have to be flipped.

  • Now that the shells are done, insert the inside shell and fit it together. Now I'm ready to fold and press the top down and get it ready for the handles.


Fit the shells together.
Fold down about 1 inch, then press.  Then another fold and press.

  • Take the strips for the handles and fold and press like you would while making a binding, press interfacing down the middle.

Fold and press
Folded and pressed, ready to sew the sides.
Sew down one side.
Flip over and sew down the other side.

  • Now that that's done I'm ready to sew on the handles. Flip tote inside out and get a couple of pins to secure the handles in place.


I align the handle with the side of the pocket, push the edge of the handle up the folded top.
Secure with a pin and sew my 1st line. (the bottom of the fold)

Fold over the handle and sew the second line. (the top part of the fold)

Done!! Now turn right side out and admire!!
(this is not the best pic, but  you can see  the inside!!
It can be used either way. I ♥ reversible!)

I really like the way this tote came out....the colors are awesome!! Perfect for a 13 year old.

Wednesday, August 24, 2011

New Tote Bag!

This is the recent tote bag I made and by recent I mean Sunday morning from midnight to 3am!! 
It's a gift for my niece, she's turning 1.  Well actually she turned 1 on Sunday, but her party is this weekend.
Well it's basically gonna be the "gift bag" for all the other stuff I made her (a quilt, shadowbox w/name & embellishments).  Plus, her mom can use it to carry all of her other items in, instead of the big bulky diaper bag. I guess my sister in law can use is for herself as well! lol!

These are the fabrics I used.


For the outside and inside pocket I added a black and white polka dot lining


The lining on the inside is this soft purple print.


Since I don't throw anything away, I used the scraps to make the multi-colored rosettes for the outside pocket.


There you have it!!  Sorry I didn't take any pics of me making it....I was in a hurry to get it done.  Her birthday party is this weekend and since I'm the queen of procrastination...I waited till the last minute!

It was just a simple basic tote bag.  If you've ever made one you know their really simple to make.  4 pieces for the bag, 4 pieces for the pockets, 2 pieces for the handles.... and zippers or velcro if you want!  I didn't have any zips or velcro since I was in a time crunch.    For sure my next bag will have zips and I will take pics.